Standing: Posture Affects Endometriosis
The first step of learning to stand properly is to disentangle your definition of "alignment" and "posture". They may seem alike, but your idea of good posture is most likely far from what good alignment looks like. I'm a visual learner, so here's some photo's.
To begin to differentiate, look at bikini model Candice on the left, a great American representation of a female in a glamorous pose. Her shoulders back, chest thrust forward, booty popped, and looking gorgeous. Just like her physique is near impossible for the average lady to mimic, leading many young women to eating disorders, so too is her posture. Mimicking the way she stands for the pose may become a daily reality for many women, exemplified by the women next to her, all standing with this "good" posture. No bueno.
STAND STRONG TO REDUCE ENDOMETRIOSIS SYMPTOMS
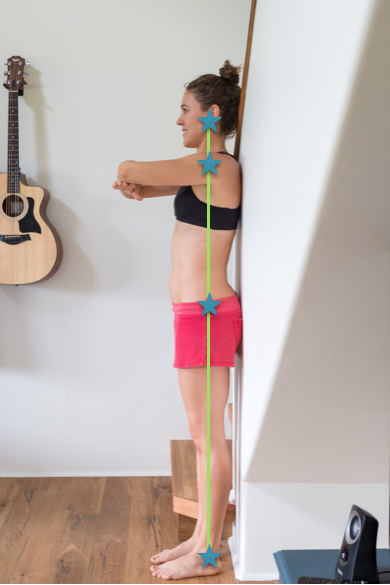
Alignment role model: ear-shoulder-hip-ankle
So what does proper alignment look like? Imagine a line from your ear to your shoulder to your hip to your ankle. This of course makes it look easy, but if you're severely out of alignment you may not be able to get here just yet, not without a wall to back up against, but it's totally do-able with a little patience.
Standing correctly is the foundation from which you move through your entire life. It's the strength that allows you to throw your kids in the air, pick up boxes as you move, help a friend in need, or walk in the park. It's literally the basis of your life's activities, if you want to be free from pain that is. If you've ever thrown out your back, tweaked your neck, hurt your IT band or shoulder girdle, you know the importance of alignment.
Not to mention a great many women with endometriosis also deal with pelvic floor (PF) issues. And serious ones at that! The typical treatment to PF weakness is to strengthen it, but more often than not the PF weakness actually stems from tension coming from how we hold our pelvis and which muscles are working or, more importantly, which muscles are not working. To make sure your pelvis is in alignment, and pelvic floor supported, learn to stand correctly with ease.
2 BASIC STANDING TIPS
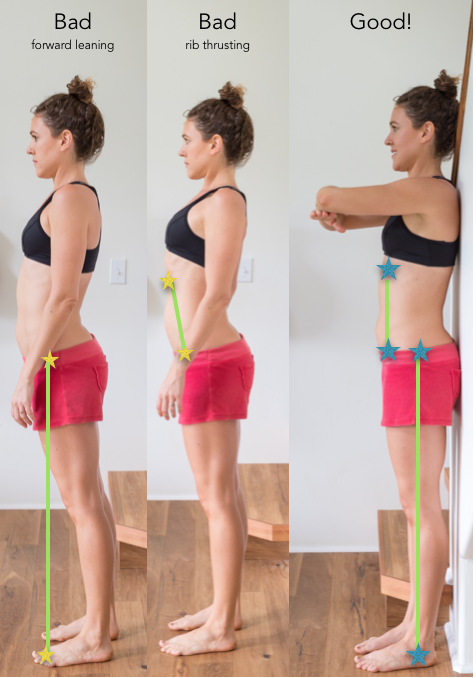
There's a lot of nitty gritty of basic standing posture, but I want to focus on 2 fundamentals of standing with the goal to knit your core back together. One will be to drop your ribs, Two is bring your hips over ankles. These two alignment corrections alone will significantly help you re-engage your core and bring gravity back through your pelvis, rather than in front of it. Here's an image to help visualize what you're feeling
left, hips forward over feet. Middle, ribs thrusting upward crushing the low back. right is good! Ribs are pulled down "stacked" over the pelvis, hips stacked over ankles
The above right posture shows more or less how you should be standing. Your bottom ribs and pelvis line up, and your ears, shoulders, hips and ankles are stacked. Your ribs -- right around or slightly below your bra strap -- should be touching the wall, as well as your derrier and back of head. Additionally, you don't want to be shoving your pelvis out in front of your body, compressing your lower back and relying on your ligaments to hold you up, rather than your muscles.
1: BRING YOUR RIBS DOWN
If you go back to the image above, and look again at the middle posture and note this is something call "rib thrusting". Although it somewhat appears to be good posture, it's actually textbook poor posture, and a wonderful way to hide your kyphosis if you have it. What's kyphosis? It's the rounded spine and pokey neck you get from, amongst other things, a lifetime of sitting hunched over a desk or computer, barely using your shoulder girdle or chest muscles. To force your head that's now pulled forward, you may subconsciously be thrusting it - and your whole rib cage - upward so now it appears to be on top of your body rather than in front. Alas this is no alignment fix, t's just a visual hack. So If you've been rib thrusting to hide it, you may be in for an emotional shock just how much kyphosis you've been hiding! (Pssst, it's seriously okay, acceptance is the first step, we can fix this. First, lower-your-ribs ;).
Left: rib thrusting. Right: she dropped her ribs
To understand if you're rib thrusting stand against a wall and feel if your back (where your bra would sit) touches the wall. It should. If it doesn't, lower your ribs until it touches. Feel hunched over? That's okay, that's correctable, but first and foremost re-connect your core.
A small test I figured out for me to tell if I was subtly rib thrusting was to grab something and lift it straight out in front of me (you could just use your arms too, they are heavier than you might think). This means your body has to exert some sort of effort to hold that weight in front of you. If I'm rib thrusting, I feel the effort coming from my shoulders, creating shoulder tension. When I put my ribs down, I feel the strength coming directly from my core. This is where you should feel it, and is the point I'm trying to drive home, of learning to move through your core ... which is connected to your pelvis ... which will bring blood to your nether regions,
2: HIPS OVER ANKLES
Ok let's move down the kinetic chain now. As you stand, zone in on where your weight is being placed. Is it through your heels -- hips stacked over heels properly? -- or do you feel it in the forefront of your foot? This will help you see if you're a forward leaner. Forward leaners are the new normal for a few reasons: 1) Chronic tension from positive heeled shoes has shortened and withered the backs of your legs, so they're tight and weak. This means it's easier to let your ligaments hold you up rather than turn on some atrophied muscles (sorry muscles, no offense, we love you!) . 2) Counters make it double easy to lean against and have them do the work your core should be doing, especially when the backs of your legs are already shortened and weak. What we want to do is start re-training our body to do what it should be doing: holding us up.
See the photo on the right from www.alignmentmonkey.com. Hips should be stacked over heels or midfoot rather than the toes. If you feel yourself being dragged forward, try to pull out of gravity and stack them hips. If you feel really unstable, stand against a wall. This will allow you to stand straight without fear of falling over.
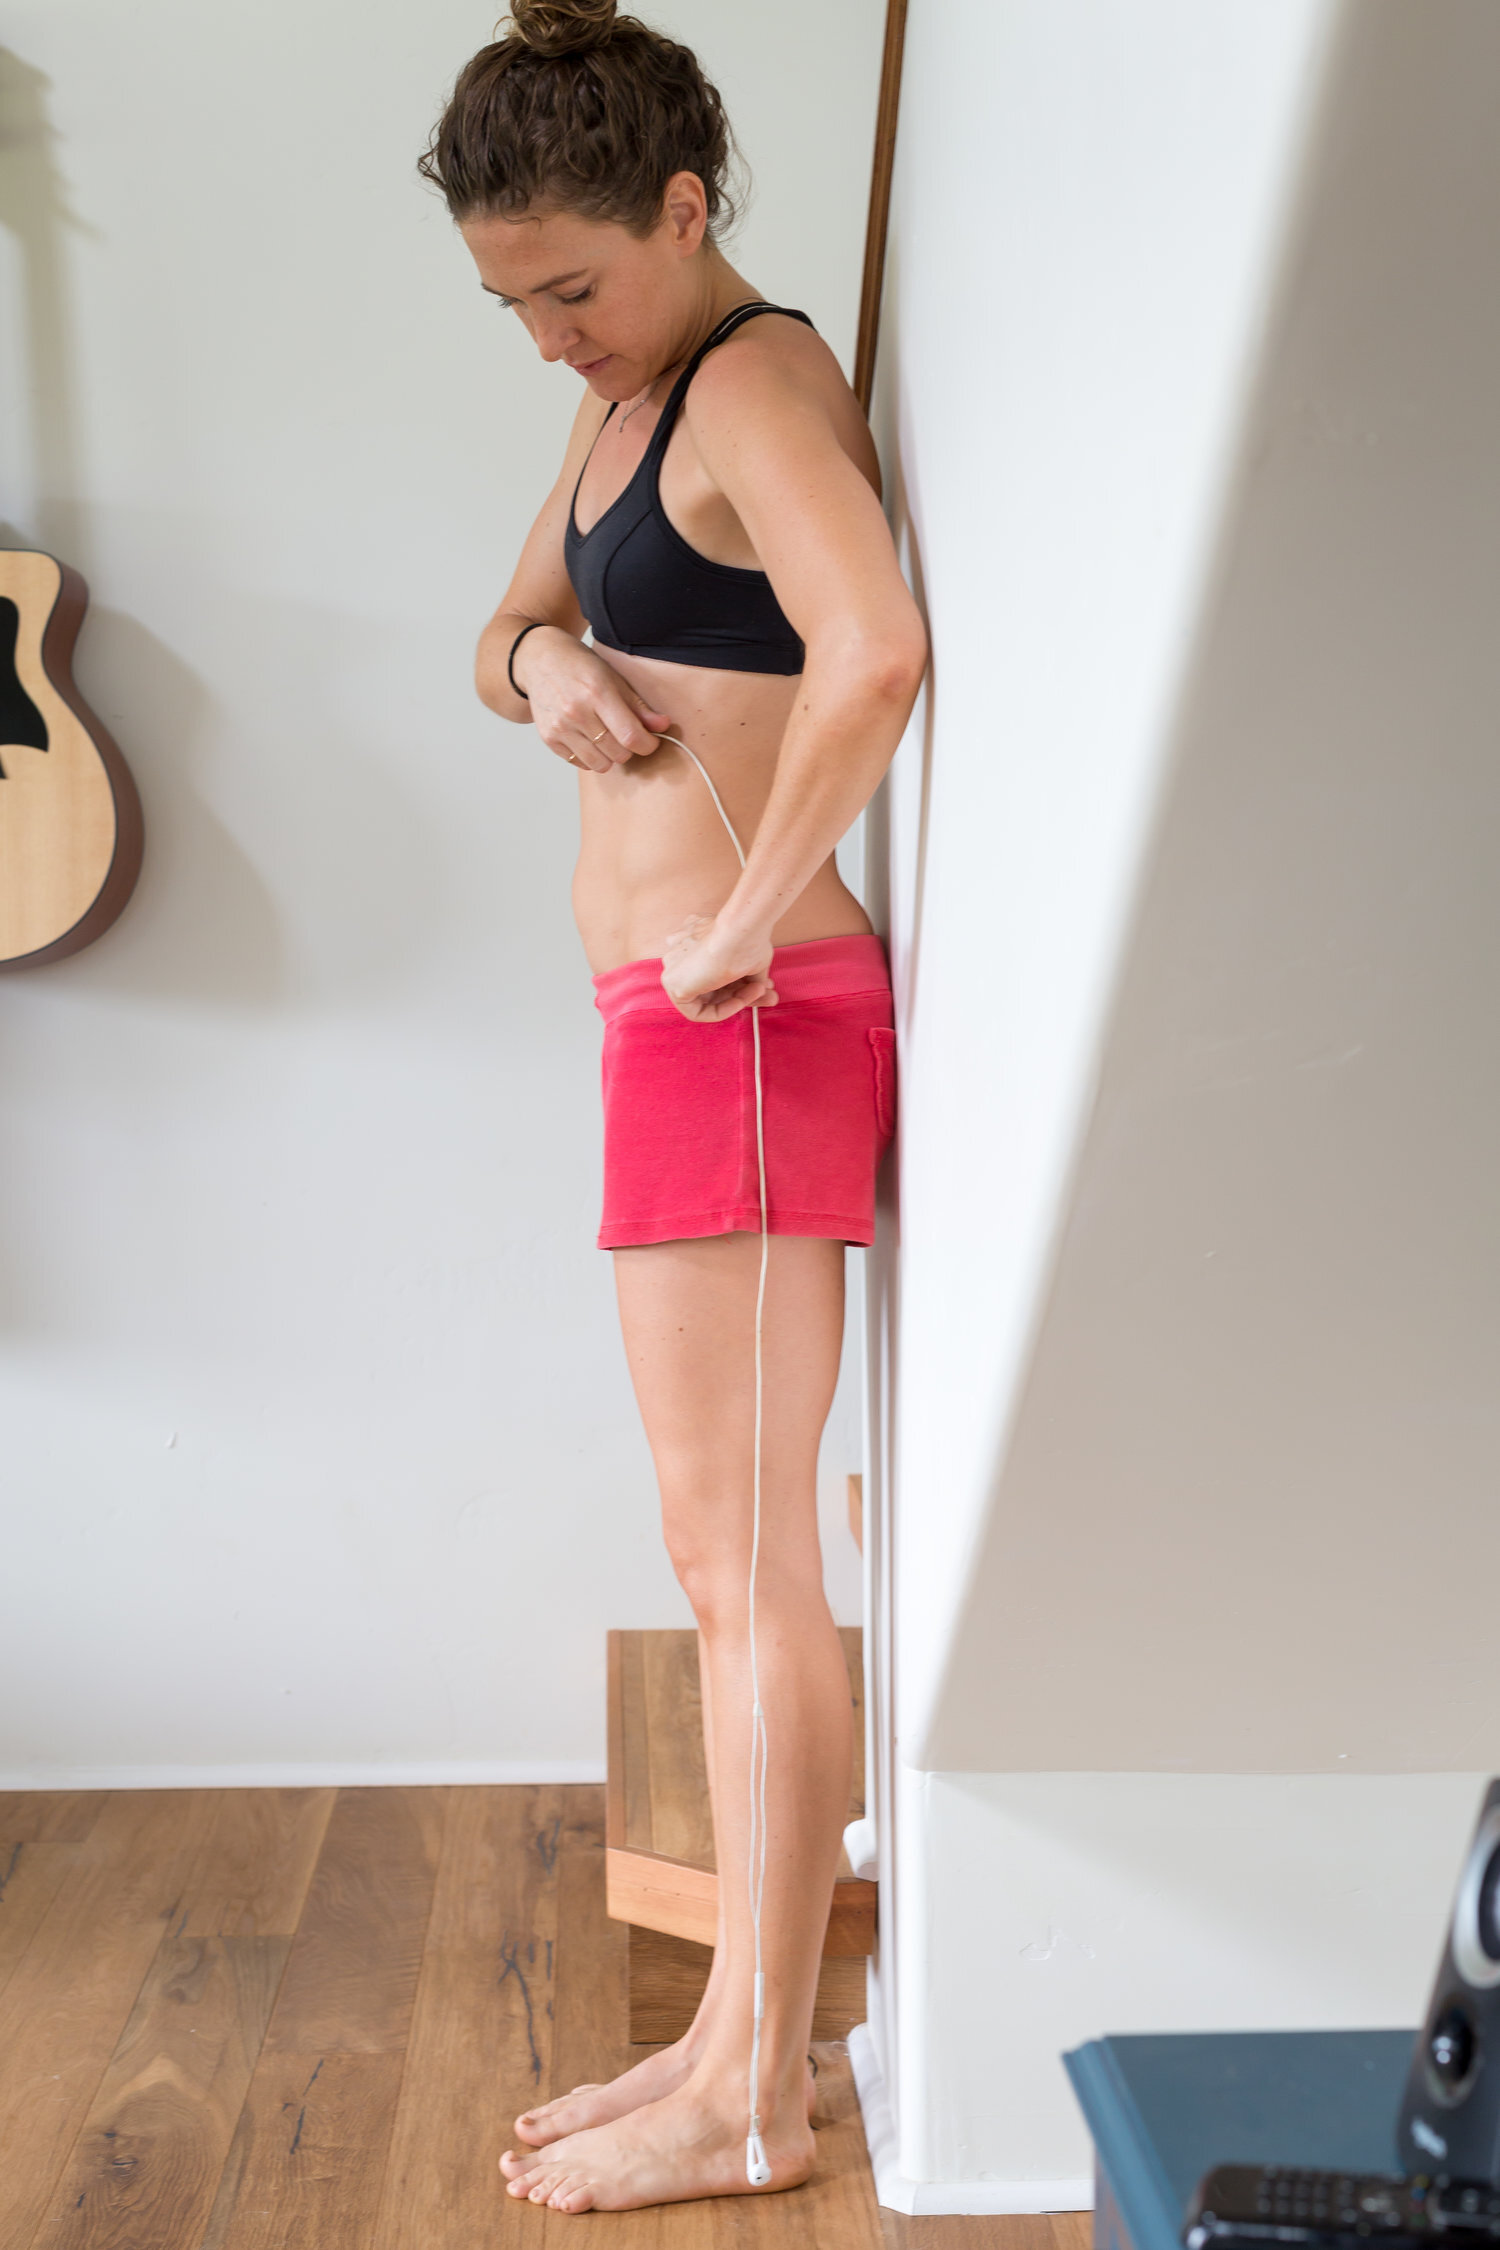
A great way to see if you're lining up is to use your headphones to check in. You can do this while you stand in line somewhere
Note, you might not be able to get your upper half to line up just yet, which is the reaction of a very tight psoas that has been chronically shortened. Again, don't worry, this is fixable! It's just really good to see where your body is currently at so you can start doing some correctives and making big changes
REHAB
Congrats if you've made it this far!! Here I'll go through a few steps to help your body relax into this new pose - ribs down, feet over ankles - until it becomes natural.
1) RELEASE YOUR KNEECAPS
This isn't really rehab, but it's an important step if you've been forward leaning your whole life... your knee caps may be locked "on". Can you release them? Stand against a wall, upright without leaning forward, and check in with your knee caps. Are they gripping? They should be relaxed, and at this very moment you should be able to wiggle them up and down by flexing your quads. If you cannot do this, try bending over a bit and trying again, per the pic on the right. The goal is to be able to lift your kneecaps easily while standing to prove to yourself (or somebody else, maybe as a party trick), that you're not gripping your quads with all your might. Practice against the wall until you can stand up on your own and wiggle them.
2) CALF STRETCH
These beautiful stretches help the backs of your legs which, remember, have been impacted by a lifetime of positive heeled shoes. Not just high heels, pretty much ALL shoes have a little lift in the heel, which create a wacko body. These are easy to do.
First, get something lifted - I cut an old foam roller in half but you can use whatever you want, I suggest a rolled up towel, yoga matt, or carpet - Ok, put your foot on in, per the pic on the left. That might be plenty of stretch for you! If you can do more, move your standing leg to meet your other one, and if you can do even more move your standing leg in front, per the pic on the right. This is more advanced, so something to work up to. Your tension will let you know what's too much, and you might feel like you're being literally pulled backwards. Listen to your body and let it release without trying to fight it.
3) DOUBLE CALF STRETCH
Second, put both your feet up, hip width apart, and start to bend over. Make sure your hips are back, not forward of your feet (this is your body secretly trying to avoid the stretch). This should feel deep and probably intense, so don't push it!! Again, let your body relax, maybe hold a chair or counter in front of you, breathing deep as you release those utterly tight back-of-leg muscles.
3) OPEN CHEST
This one is nice because it lets gravity do the work for you. Lay on your side on the floor, shoulders, hips and knees stacked * I'll re-iterate, shoulders, hips and knees stacked * (this is an easy way to cheat, you'll see why). Now open your hand away from each other and let gravity do the work opening your chest as you take deep breaths. You will probably notice your lower body shifting so the hips and knees aren't stacked, please restack them. If you don't, your body is basically untwisting itself so your chest isn't being stretched. As you breathe, watch in amazement as your hand gets closer to the ground! Do 1 minute each side.
4) PSOAS RELEASE
Another nice one if you're slightly immobile (ie in excruciating endo pain and not wanting to do much) because you can just lay there and feel productive!! Again, gravity does the work, you just watch the Daily Show or something.
Lay on the floor with a chair or couch under both legs so they're at a 90 degree angle. Your sacrum should be touching the floor, and as you lay you should feel your lower back slowly releasing until it too touches the floor. Hold this position for 5-10 minutes -even if you don't feel anything your psoas will thank you.
NEXT STEPS:
learn and read more! Alas, because there is more to it than I can possible write on this page, I'm here listing my favorite links that will start you on your alignment journey. Remember, you have your whole life ahead of you to work on this stuff, so try not to be overwhelmed and shut down. If it seems too much, focus on one thing at a time. If you do that then you will definitely improve at least one thing, and hopefully see enough improvement to want to do more :)
LINKS FOR MORE INFORMATION ABOUT ALIGNMENT AND STANDING
STANCE
SHOULDERS BACK DOES NOT MEAN PELVIS FORWARD
ARE YOU A RIB THRUSTER
CHRONIC MUSCLE TENSION BE GONE
5 TIPS ON SAVING YOUR KNEES
THE HIDDEN COST OF HIDING KYPHOSIS
LINKS OFFERING SPECIFIC MOVEMENT CORRECTIVES. ONLY ONE IS NOT FREE (BUT IT IS REALLY WORTH IT IF YOU HAVE A TIGHT PELVIS), BUT ALL WILL GIVE YOU A BETTER UNDERSTANDING OF WHERE TO GO NEXT.
A GREAT LIST OF CORRECTIVE EXERCISE TO GET YOU STARTED
A DVD WORTH THE INVESTMENT: DOWN THERE FOR WOMEN
CALVES, HAMSTRINGS, AND FORWARD FOLD
PERIOD BACK PAIN RELIEF
MENDING YOUR KYPHOSIS
STOP USING YOUR UPPER SHOULDERS (TRAPEZIUS) FOR, LIKE, EVERYTHING
ACTIVATE YOUR DEEP CORE MUSCLES
**THESE ARE JUST A FEW OF THE THOUSANDS OF AMAZING ALIGNMENT ARTICLES OUT THERE. HOPEFULLY THERE'S ENOUGH TO GET YOU STARTED ON YOUR JOURNEY, AND IF YOU HAVE QUESTIONS PLEASE FEEL FREE TO EMAIL ME!


